I frequently receive requests for displaying contents of a list in an A-Z index of sorts where items also need to be grouped by the first character in their title or name or some other value. I know there are different ways of solving this. This post provides a "crude" way of satisfying this request using Calculated columns.
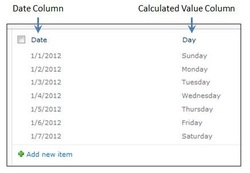
Let's say that the Title column is the one that needs to be sorted alphabetically. I then create a calculated column (for our example, we're going to name it IndexCode) and I use the formula:
code([Title])
This returns the code for the first character in the string contained in the Title column. In some cases, that's all I need. However, since this formula returns a numeric value (65 for A, 66 for B, 67 for C, and so forth), it might not be useful when you need to display it on a page. So my next step is to convert that number back to a character. For this, I created yet another calculated column (continuing with our example, we're going to call Index) and this time I use the following formula:
char([IndexCode])
This formula returns the character specified by the code number in the IndexCode column (A for 65, B for 66, C for 67, etc.). Now I can use this one in, for example, Content Query Web Parts for grouping my items.
Lastly, users may not care for typing things in upper case. If this is something you may want to use for your index, you may want to use the upper([ColumnName]) formula.
For more formulas that you can use in SharePoint, you may want to visit this other web site.
 RSS Feed